3D Printer for Homes and Schools
The Neptune 4 Plus is great for 3D printing in homes or schools. That is why I jumped at the chance to review the new Neptune 4 Plus from ELEGOO, who are renowned for making high specification 3D printers at affordable prices and with really large print areas.
One of the best gifts we ever bought our son for his birthday was his first 3D printer. He was only 10 years old at the time and our primary concerns when choosing one were safety (since the nozzles on 3D printers get very hot) and ease of use. He still has the printer in his bedroom a couple of years later and has gone through a phenomenal amount of filament, printing custom made toys and badges for himself and his friends. Needless to say, he loves 3D printing because of this.
As Harrison’s dad, I also love seeing him 3D print because it’s improved his knowledge of manufacturing and how plastics are used and can be manipulated. We also love searching for 3D files to download, and “slice”. Slicing is the process used to convert generic 3D model files into the correct file for a particular printer, and using 3D printing software to do this has really helped Harrison learn about different file types as well as building on his IT skills and knowledge of design and technology. It also gave him a great head start when it came to moving into high school and starting Design and Technology classes. But, since the machine was a very basic model, with a really limited print area, we were always going to have to move on from it at some point.
Our experiences with the ELEGOO Neptune 4 Plus
It’s probably best to start off by noting that I’m by no means a 3D printing expert, and all of my experiences are from the point of view of an enthusiastic beginner with a child that loves to make things. When it comes to selecting any product that I’m not an expert on I tend to turn to tech websites like Tom’s Hardware and Tech Radar, so it was reassuring to read that the Neptune 4 range had really positive feedback from both, with Tom’s Hardware noting that “the ELEGOO Neptune 4 Plus offers the best compromise between size, speed, and price that we’ve ever seen in a desktop filament 3D printer”.
Since Tom’s hardware started off with size I’ll do the same and point out that the Neptune 4 Plus is big, with a huge printable area of 320 x 320 x 385mm, which is easily big enough to print anything that myself or Harrison would want to print, and is more than large enough to print a full size facemask, for any wannabe superheroes in the house. Having such a large printing volume means the Neptune 4 Plus itself is pretty big, with a footprint of around 533 x 517mm, and a height of 638mm. It’s pretty heavy too, weighing in at around 14kg compared to the tiny printer we’ve been using thus far.
Assembly wise, it took me around 35 minutes to build – on my own, as I didn’t want to risk Harrison breaking any parts or losing any bolts during the initial set up. It was a straightforward process with easy-to-follow instructions and basically consisted of attaching the gantry to the base, attaching a bracket with the hot end onto the top of the gantry, bolting the cooler behind the hot end and then a few smaller steps – like attaching the filament spool, attaching a bracket for the LCD control pad and running a few wires between all these.
Because this was being set up for the first time, I also had to level the print bed. This is by no means as scary as it sounds and basically involved following instructions from the LCD keypad and adjusting some screws on the underside until the printer nozzle was lightly clamping down on a sheet of paper. This is done in a few key areas and guided by the LCD screen, after which the machine carries out an automated process to self-level itself.
And that’s all there was to it, I was now ready to start printing.
Harrison was immediately enamoured by the cool ambient glow of the LED lights that run across the frame of the printer. They don’t provide lots of light but there is a really satisfying aesthetic to them when the printer is turned on.
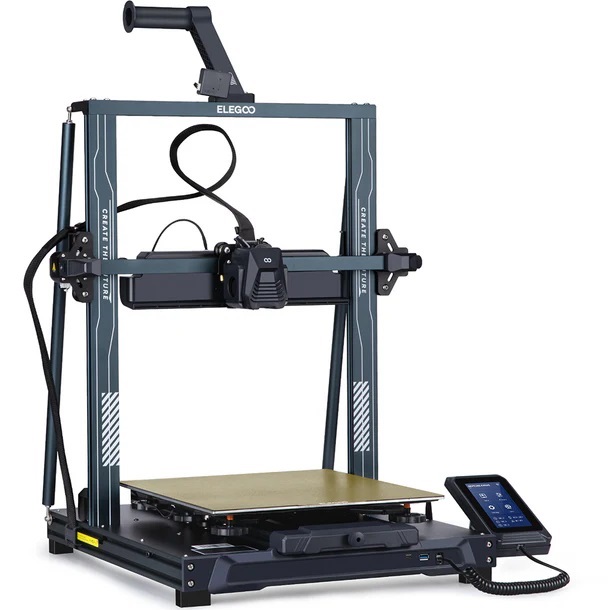 There’s a touch screen LCD control panel that’s attached magnetically to the Neptune 4 Plus. It’s slightly larger than a typical smartphone and extremely straightforward to use. Within moments of picking it up – and inserting a memory stick into the main unit – Harrison was able to locate some of the print files that came bundled with the printer.
Because these were already bundled with the printer, we didn’t need to do anything with the files before printing, so we started off with the “benchy” boat. This boat is pretty small for the Neptune 4 Plus’ print area, but it’s as big as anything Harrison had ever printed on his old printer. Objects this size on his TINA printer usually took well over an hour and sometimes two hours, but on the Neptune 4 Plus the boat was printed in around 20 minutes. We were both blown away by how quickly the machine was able to print this.
Software
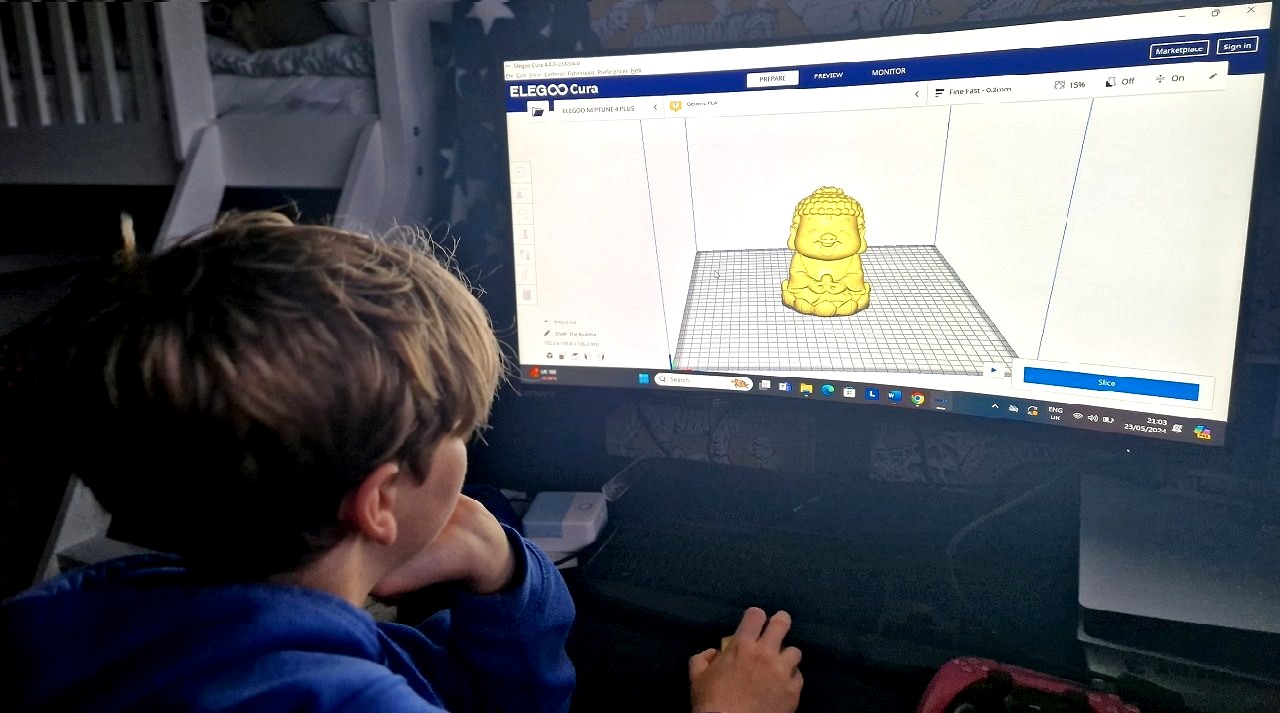
Looking for some files of our own, Harrison found an “Agent Peely” model from Fortnite that he liked the look of on a 3D printing website called Thingiverse, where files can be downloaded free of charge. These files are in a generic format that need converting or “Slicing” into the correct format for your printer. To do this you use specialist software. The Neptune 4 Plus comes with a copy of ELEGOO Cura. Cura is a well-regarded programme that’s known as being user friendly, with an interface that doesn’t overwhelm beginners, but also having more advanced features that can be used by those in the know. We already had Cura on our computer as it’s free software and we preferred to use it on our old TINA printer than their own software, so we were comfortable enough knowing how to use it.
Complete beginners might take a little time getting to grips with the software but because the ELEGOO version already has the correct settings for the Neptune 4 Plus there’s no need to customise any settings, it’s already done for you. It can be as simple as finding the file you’d like to print on Thingiverse, downloading the file (they come as generic “STL” files), then opening this file on Cura, dragging the model into the cube that represents the printing area, and then hitting the “prepare” button. This will then prompt you to save the file in the correct format for the Neptune 4 Plus. After that you can just use this file on the printer. It can be as simple as that. Your file will almost certainly be smaller than the huge print area of the Neptune 4 Plus, so it will only need resizing if you want to enlarge the file, which is really simple to do also. There are no end of more complex settings for anyone who loves tinkering around though.
Speed
The speed of the Neptune 4 Plus is breathtaking, especially for the price, with a print speed of 500mm/s. For those who don’t know how this works on a 3D printer, the speed is how quickly the printhead moves along the X and Y axes as it lays down a layer of material. To show the speed in real terms we used a print that Harrison made for his grandad’s grave last year. This was a love heart about 10cm wide and 3cm high. This took two hours to print on his TINA printer, yet the same print took just 35 minutes on the Neptune 4 Plus, using the recommended settings (200mm/s). The higher settings would have made this even quicker.
As well as printing quickly the Neptune 4 Plus is exceptionally quick to heat up too, with the base plate getting to full temperature (110 degrees Celsius) in under a minute. It’s probably worth noting at this point that the Neptune 4 Plus heats up the entire base plate for every job, which is a shame as not every job (in fact most jobs for us) won’t use such a large area. The Neptune 4 Plus does have a sister model (the Neptune 4 Pro) that allows segmentation of the base plate for more efficient use of power.
Noise and WiFi
3D printers can make a bit of noise, with all the moving parts whirring around, and the Neptune 4 Plus is no exception. On top of the moving parts are fans, which also make a fair amount of noise in themselves. These can be turned off, but for intricate jobs, with delicate overhanging features it’s best to leave them turned on so that these delicate parts can be quickly cooled and avoid any imperfections. So, while having these fans is a good thing for 3D printers, you’re not going to have the Neptune 4 Plus printing somewhere that you need peace and quiet, or close to where you’re trying to watch TV.
Luckily the ELEGOO Neptune 4 Plus has integrated WiFi that means you can remotely start and monitor a print; you could even watch the print by plugging in a USB webcam directly to the Neptune 4 Plus if you wanted to keep an eye on it too. I’ve not fiddled around with these aspects yet, but I’m hoping they will come in handy, as we have the printer set up in our garage, to minimise noise in the house and also keep any fumes from the printer out of the living room or bedrooms.
Health and Safety
Our old TINA 3D printer was a very limited machine, but it was enclosed, with the hot end that contained nozzle being pretty much out of reach unless you were to stick your hands inside the machine while it was switched on. It also didn’t have a heated base plate, so there was very little danger from the machine apart from inhaling the fumes. The Neptune 4 Plus is a proper 3D printer and as such has to be treated with respect. Both the nozzle and the base plate get very hot and it’s important that children understand this from the get-go. That said, it’s no different from an iron, a kettle or a boiling pan in that respect and these things need to be learned at some stage, but a 3D printer needs to be used away from very young children.
ELEGOO are very informative about the potential dangers of fumes from 3D printers as well and have a great page about minimising dangers, which obviously include using them in a well-ventilated area. The worst offenders for toxic fumes are resin printers. Luckily the Neptune 4 Plus uses PLA, which is much safer, but it is still important to use 3D printers in well-ventilated areas, the same way you would for anything else that gives off fumes, smoke or dust and it’s reassuring that ELEGOO acknowledge this and give advice on the subject.
Verdict and some results
The ELEGOO Neptune 4 Plus is a great quality 3D printer that is perfect for beginners and enthusiasts alike. Many of the major tech websites have the Neptune 4 Plus in their lists of recommended 3D printers. Size wise it might be a little too large for anyone that struggles with space in their home, and it might make more sense to opt for the Neptune 4 rather than the Neptune 4 plus.
 In my opinion the Neptune 4 Plus, and other 3D printers in the Neptune range are perfect for schools, they’re very affordable and a great way to develop children’s understanding of design and technology, while being able to make full use of its size.
In the photographs you can see a few little toys Harrison has made for himself and his sister. There are no end of models on Thingiverse to download and print, and many of these are things are ingenious ideas that you’d struggle to buy in shops. Harrison has already printed off a model that turns a regular mouse from a computer into an arcade spinner so that we can make an old school Pong game, which he intends to code himself. The possibilities are endless.
I’ll leave you with some of the pros and cons of the Neptune Four Plus, from Tom’s Hardware, and the link to their full review, for more technical details.
Pros
• 400W PSU for rapid nozzle and bed heating
• Integrated Wi-Fi
• Powerful part cooling fan module
• Silent stepper drivers
• 5.2:1 dual gear direct drive extruder
• Klipper firmware
Cons
• Custom nozzle size currently not available
• Semi-automated leveling system lags behind comparable machines
Where to buy
The Neptune 4 Plus can be bought on various websites, including ELEGOO’s own website, their Amazon page , and their eBay page.


It sounds brilliant, but unfortunately out of my price range.
What a great gadget to have at home and school
My grandson wants one of theses I dread to think what he would make
What a great Gadget to have at home
What a great gadget to have at home and school. It’s really fantastic